Most websites have technical problems that nobody knows about — not the owner, not the developer, not even Google. Pages that can’t be crawled. Redirects chained together like a game of telephone. Images so large they time out before they load. These issues quietly drain rankings, tank user experience, and cost you leads every single day.
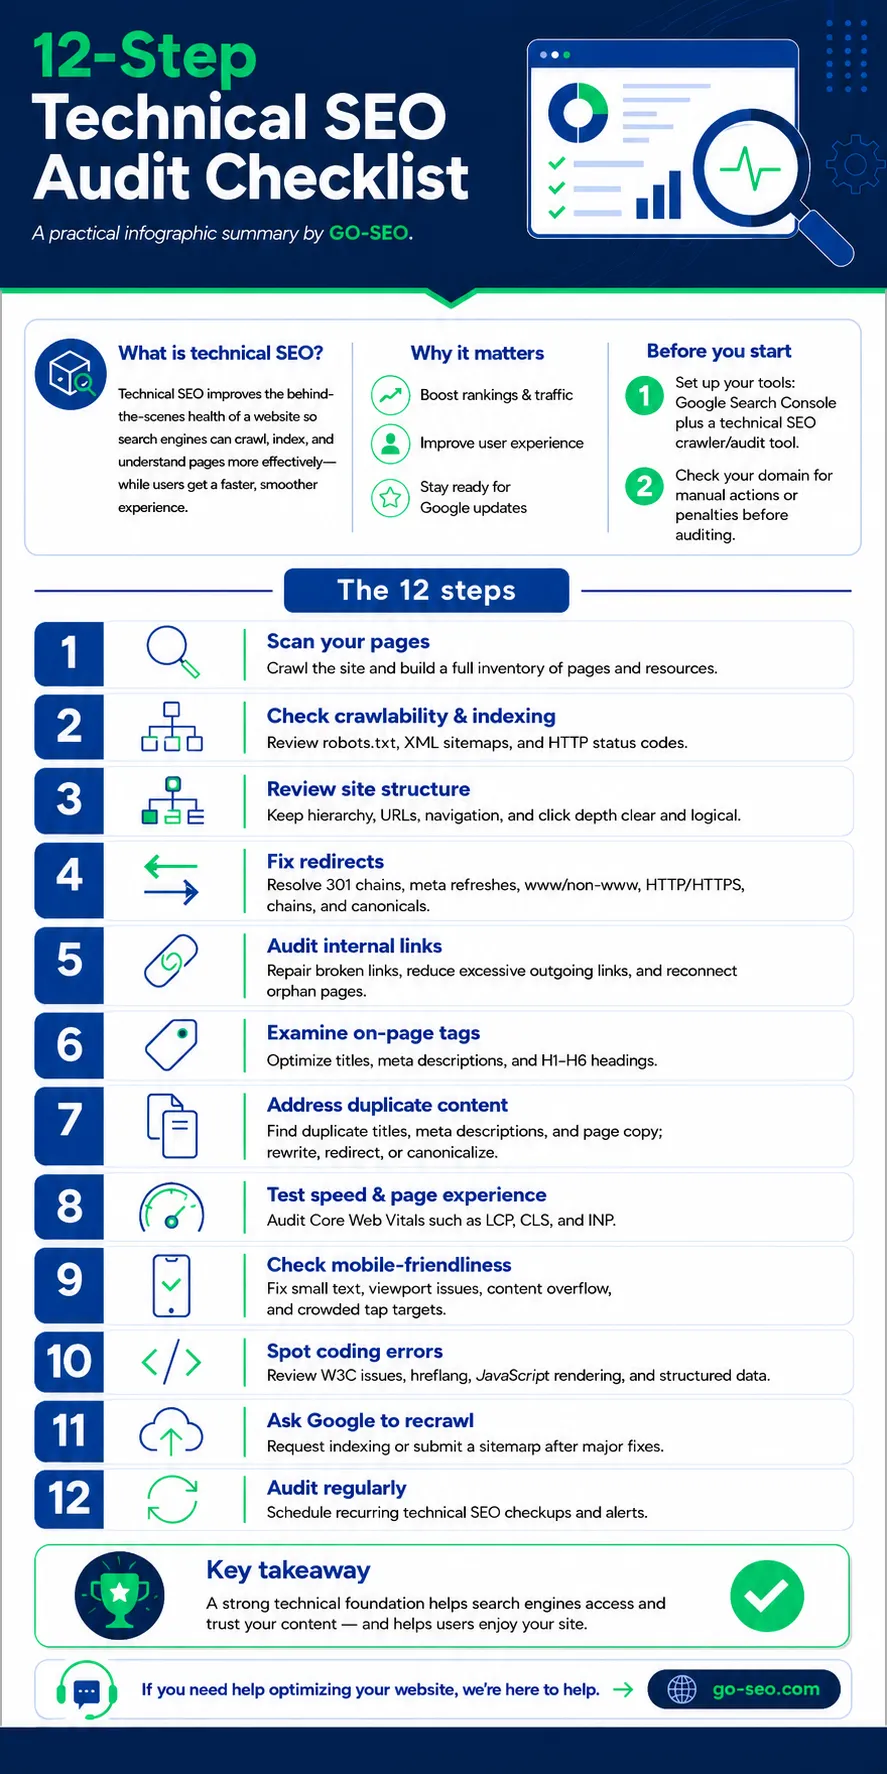
The 12-step technical SEO audit checklist, a practical summary by GO-SEO, click image to download.
A technical SEO audit is how you find them. It’s a systematic review of the behind-the-scenes health of your website — the infrastructure that determines whether search engines can access, understand, and trust your content. I’ve been doing these audits for clients since 2007, and I still find surprises on sites that look perfectly fine on the surface.
This guide walks you through all 12 steps of a thorough technical SEO audit, from the tools you’ll need before you start to the recurring schedule that keeps problems from coming back. Whether you’re doing this yourself or handing it off to an SEO professional, this checklist covers everything that matters.
Before You Start: Two Things to Do First
Before you crawl a single page, get your tools in order. At minimum, you need Google Search Console (free and essential) and a technical crawl tool — Sitebulb, Screaming Frog, or a comparable audit platform. Search Console gives you Google’s perspective on your site. The crawl tool gives you ground truth on what’s actually there.
You also need to check for manual actions or penalties before you do anything else. If your site is already under a Google penalty, the audit findings take on a different priority order. In Search Console, go to Security & Manual Actions → Manual Actions. If it says “No issues detected,” you’re clear to proceed. If it doesn’t, that becomes the first problem to solve — everything else is secondary.
The 12 Steps
Step 1: Scan Your Pages
Start by running a full crawl of your site. This gives you a complete inventory of every URL, image, CSS file, JavaScript file, and other resource your site contains. Think of it as taking a census before you start drawing conclusions. A great tool for this is Screaming Frog. The free version will crawl up to 500 URLs and provides about 90% of the information you’d ideally need for a pro-level technical audit. Don’t worry, this will reveal plenty of issues (and work!) for most small business sites.
What you’re looking for at this stage isn’t problems specifically — it’s scope. How many pages does the site actually have? Are there URLs you didn’t know existed? Staging pages that got indexed accidentally? Old campaign landing pages that were never cleaned up? The crawl data becomes the foundation for every step that follows, so take your time here and make sure the crawler has access to everything (temporarily disable any IP-based restrictions if needed).
Pay attention to the crawl depth report as well. Pages buried six or seven clicks from the homepage are hard for Google to prioritize. If important content is sitting deep in the site architecture, that’s a structural issue you’ll address in Step 3.
Step 2: Check Crawlability & Indexing
Crawlability and indexability are two different things, and both need to be right. Crawlability means Google can reach a page. Indexability means Google is allowed to include it in search results. You can have a perfectly crawlable page that’s explicitly blocked from the index — and you’d never know unless you checked.
Start with your robots.txt file. Are there any Disallow rules that are blocking content you actually want indexed? This is more common than you’d think, especially on sites that went through a development phase where robots.txt was set to block everything. Next, review your XML sitemap. It should contain only canonical, indexable URLs — no redirects, no noindex pages, no URLs with parameters. Submit it fresh in Search Console and confirm there are no reported errors.
Finally, spot-check key pages using the URL Inspection tool in Search Console. This tells you exactly how Google sees each page — whether it’s indexed, when it was last crawled, and whether there are any coverage issues to address.

Step 3: Review Site Structure
A well-structured site makes it easy for both users and search engines to understand what the site is about and how pages relate to each other. A poorly structured site forces Google to guess — and Google’s guesses aren’t always in your favor.
Your URL structure should be clean, descriptive, and hierarchical. Categories should have their own URLs. Subcategories should nest logically beneath them. Navigation should reflect the hierarchy, not contradict it. And click depth — the number of clicks it takes to reach any given page from the homepage — should be three or fewer for anything you want to rank.
Look for orphan pages (pages with no internal links pointing to them), which are effectively invisible to Google regardless of their content quality. Also look for pages that are important but sitting too deep in the architecture. Both are structural problems with structural solutions.
Step 4: Fix Redirects
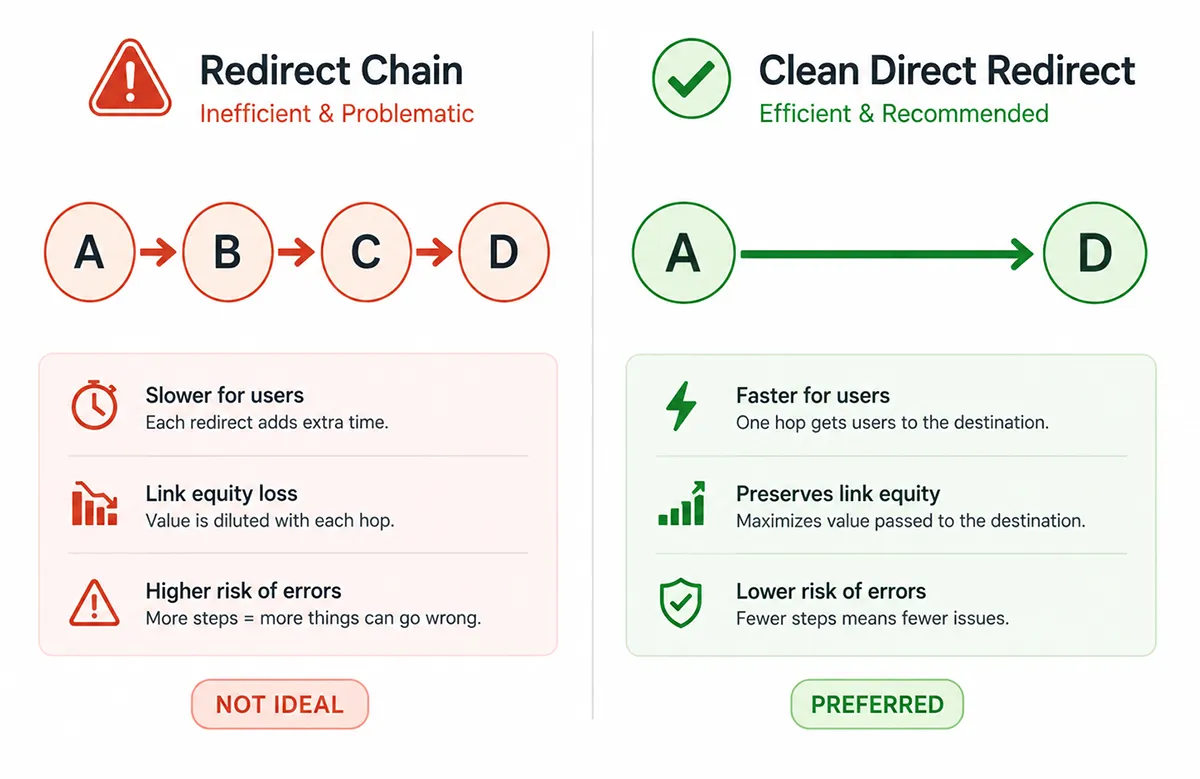
Redirects are one of those things that accumulate silently over time. You move a page. Six months later you move it again. A year after that, the URL scheme changes site-wide. Now you have chains: URL A redirects to URL B, which redirects to URL C, which is where the page actually lives. Each hop in that chain costs you a small amount of crawl efficiency and potentially some link equity.
The goal is simple redirect paths: A goes directly to the final destination. No chains, no loops, no redirect pointing back to itself. While you’re at it, resolve any www vs. non-www inconsistencies and confirm that HTTP is redirecting cleanly to HTTPS. Check your canonical tags as well — they should always point to the preferred version of each URL, and that preferred version should match what’s actually accessible.
Also watch for meta refresh redirects, which are HTML-level redirects rather than server-level. These are generally bad practice and should be replaced with proper 301 server redirects wherever they exist.
Step 5: Audit Internal Links
Internal links are how you pass authority around your site and tell search engines which pages matter most. Done well, internal linking can meaningfully lift rankings for pages that have good content but not enough external link equity pointing at them. Done poorly — or neglected entirely — it’s a missed opportunity that compounds over time.
Your crawl tool will flag broken internal links (404s), which should be fixed or redirected immediately. Beyond that, look at how link equity is flowing through the site. Are your most important pages receiving internal links? Are there high-authority pages that aren’t linking out to anything useful? The best internal linking strategies are intentional, not accidental.
Pay close attention to anchor text. Generic anchors like “click here” or “read more” waste an opportunity to give Google context. Descriptive anchors that include your target keywords — used naturally, not robotically — are meaningfully better for SEO. Also check for excessive outgoing links on individual pages, which dilutes the value passed to any single destination.
Step 6: Examine On-Page Tags
Title tags, meta descriptions, and header tags (H1 through H6) are the on-page signals Google uses to understand what a page is about. Getting them right won’t single-handedly rocket you to page one, but getting them wrong creates drag that holds back everything else you’re doing. These are also among the most common on-page SEO mistakes I see on new client sites.
Every page should have a unique title tag that includes the primary keyword and stays under 60 characters. Meta descriptions should be compelling, unique, and under 155 characters — not keyword-stuffed, but written to earn the click from someone who sees them in search results. Every page should have exactly one H1 that aligns with the title tag and the page’s search intent. H2s and H3s should structure the content logically, not just break up visual space.
Your crawl tool will flag missing tags, duplicate tags, and tags that are too long or too short. Work through the list systematically — prioritize your highest-traffic and highest-value pages first, then work down.
Step 7: Address Duplicate Content
Duplicate content confuses search engines. When the same content exists at multiple URLs — even slightly different URLs — Google has to decide which version to show in search results. It doesn’t always pick the one you’d prefer. And when it can’t decide, it may simply reduce visibility for all versions.
The most common sources of duplicate content on WordPress sites: URL parameters creating alternate versions of pages (e.g., ?page=1 or ?color=blue), www vs. non-www duplicates, HTTP vs. HTTPS duplicates, and category/tag archive pages that replicate post content. Your crawl tool will surface most of these.
The fixes depend on the cause. Canonical tags handle parameter-based duplication. 301 redirects consolidate URL variants. In some cases — like thin category pages — the right answer is noindex, which removes the page from Google’s index without deleting it from the site. What you don’t want to do is ignore it and hope Google figures it out on its own.
Step 8: Test Speed & Page Experience
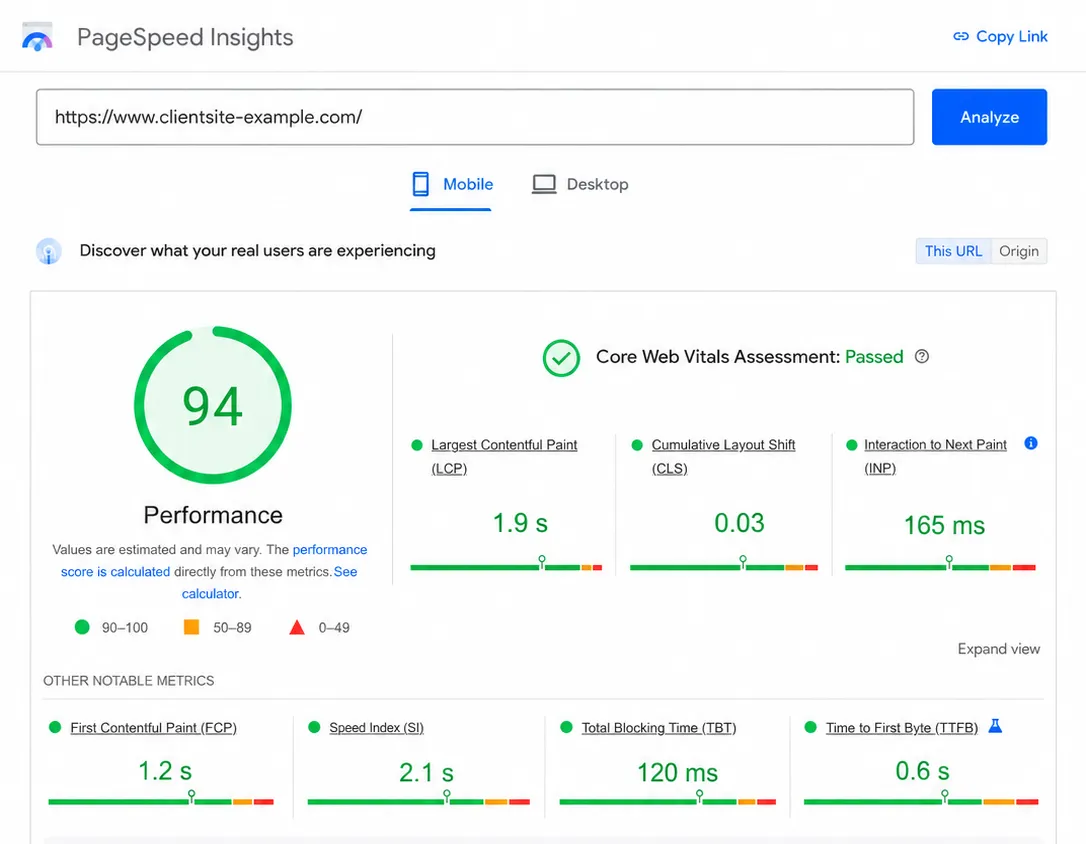
Page speed has been a confirmed Google ranking factor for years, and Core Web Vitals — the specific metrics Google uses to measure page experience — are baked into how sites are evaluated. The three to focus on: Largest Contentful Paint (LCP, which measures loading speed), Cumulative Layout Shift (CLS, which measures visual stability), and Interaction to Next Paint (INP, which measures responsiveness).
If you want to understand these metrics in depth, my Core Web Vitals guide covers each one with practical fixes. One issue that comes up constantly: oversized images are the single most common cause of poor LCP scores. Also check your Time to First Byte (TTFB), which reflects server response speed — a slow TTFB means every subsequent load metric starts behind.
Use PageSpeed Insights for page-level diagnostics. Use Search Console’s Core Web Vitals report for site-wide field data, which shows how real users are actually experiencing your pages. Lab data and field data often diverge — field data is what Google uses to rank.
Step 9: Check Mobile-Friendliness
Google indexes the mobile version of your site first. This isn’t a preference — it’s how the entire system works. If your mobile experience is broken, your rankings reflect a broken site, full stop.
Common mobile issues: text that’s too small to read without zooming, tap targets (buttons, links) that are too close together for a human finger to hit accurately, content that overflows the viewport horizontally, and resources that load on desktop but don’t render on mobile. Google’s Mobile-Friendly Test will flag the obvious problems, but there’s no substitute for actually using the site on a phone and going through your key pages manually.
If you’re using a page builder like Divi, test mobile views across multiple real devices when possible — browser emulation in DevTools doesn’t always catch everything. Viewport meta tag issues, which affect how the browser renders the page on mobile, are also worth verifying in your crawl data.
Step 10: Spot Coding Errors
The code underlying your pages affects how search engines interpret and render your content. Even if a page looks fine visually, errors in the markup can cause Google to misread the page structure, skip your structured data, or render JavaScript-dependent content inconsistently.
Run key pages through the W3C Markup Validator to catch HTML errors. Check your structured data (schema markup) using Google’s Rich Results Test to confirm it’s valid and eligible for rich results in search. If you’re running JavaScript-heavy content — especially content that’s loaded dynamically — verify that Google can actually render it. Search Console’s URL Inspection tool has a “View Crawled Page” option that shows you the rendered HTML Google actually sees.
For international sites, audit your hreflang implementation. Incorrect hreflang tags are among the most technically complex issues to untangle, and the errors are rarely obvious until rankings start behaving strangely across regions or language variants.
Step 11: Ask Google to Recrawl
After you’ve worked through the audit and made substantive fixes, let Google know. Don’t sit and wait for the next natural crawl — actively request reindexing for the pages you’ve changed.
For individual pages, use the URL Inspection tool in Search Console and click “Request Indexing.” For site-wide changes, resubmit your XML sitemap. This tells Google’s crawlers there’s something worth revisiting. It doesn’t guarantee immediate reindexing, but it moves you to the front of the queue faster than waiting passively.
Keep a log of what you fixed and when — this lets you connect the timeline of your changes to any shifts you see in rankings or impressions in the weeks that follow. That documentation is also useful if a client or stakeholder asks what happened and why things improved (or didn’t).
Step 12: Audit Regularly
A technical SEO audit isn’t a one-time event. Websites change constantly — new pages are added, plugins are updated, code changes get pushed, content gets reorganized. Every one of those changes is an opportunity to introduce a new technical problem. The sites I see with the cleanest technical foundations are the ones where someone is paying attention on a schedule, not just reacting to drops.
At minimum, schedule a full technical crawl quarterly. Set up Search Console alerts so you’re notified about coverage errors, Core Web Vitals regressions, and manual actions as soon as Google detects them. For larger sites with more frequent changes, monthly crawls and weekly spot-checks on key pages are worth the time investment.
The goal is to catch problems when they’re small — before they accumulate, compound, and require a full remediation project to untangle.
Technical SEO Audit: Frequently Asked Questions
What is a technical SEO audit?
A technical SEO audit is a systematic review of the behind-the-scenes infrastructure of a website to ensure search engines can crawl, index, and understand its pages. It covers areas like site structure, redirects, page speed, mobile-friendliness, duplicate content, internal links, and structured data.
How long does a technical SEO audit take?
The time required depends on the size and complexity of the site. A small business website with under 100 pages might take a few hours. A large e-commerce or enterprise site can take several days of crawling, analysis, and documentation. Most professional audits for SMB sites are completed within one to two business days.
What tools do I need to do a technical SEO audit?
At minimum, you need Google Search Console (free) and a site crawl tool such as Sitebulb or Screaming Frog. Additional tools that add value include PageSpeed Insights for Core Web Vitals analysis, the W3C Markup Validator for code errors, and Google’s Rich Results Test for structured data validation.
How often should I run a technical SEO audit?
For most small to mid-size websites, a full technical audit should be run quarterly. Larger or more frequently updated sites benefit from monthly crawls and ongoing monitoring through Google Search Console alerts. Major site changes — redesigns, migrations, or significant content reorganization — should always be followed immediately by a technical audit.
What is the difference between crawlability and indexability?
Crawlability means a search engine bot can access and visit a URL. Indexability means the page is allowed to be included in search results. A page can be crawlable but not indexable — for example, if it has a noindex tag. Both need to be correct for a page to appear in Google search results.
What are Core Web Vitals and why do they matter for SEO?
Core Web Vitals are a set of page experience metrics that Google uses as a ranking signal. They measure Largest Contentful Paint (LCP, or loading speed), Cumulative Layout Shift (CLS, or visual stability), and Interaction to Next Paint (INP, or responsiveness). Sites that pass Core Web Vitals thresholds may receive a ranking boost over comparable sites that fail them.
What is duplicate content and how does it affect SEO?
Duplicate content occurs when the same or very similar content exists at multiple URLs on a site. It can cause search engines to split ranking signals between versions, index the wrong version, or reduce visibility for all versions. Common causes include URL parameters, www vs. non-www variants, HTTP vs. HTTPS variants, and thin archive pages. Canonical tags and 301 redirects are the primary solutions.
A Strong Technical Foundation Changes Everything
Technical SEO isn’t the most visible part of what we do, but it’s the part everything else depends on. The best content in the world doesn’t rank if Google can’t crawl it. The strongest backlink profile doesn’t help a page that’s inadvertently set to noindex. Speed problems undercut conversion rates before anyone even reads a word.
If you want to understand just how many signals go into Google’s evaluation of your site, the full breakdown of Google ranking factors is worth reading alongside this audit checklist. Technical SEO addresses a meaningful slice of what’s on that list.
If you’d like a professional set of eyes on your site’s technical health, that’s exactly what we do. We’ve been running technical audits for clients across industries since 2007 — and we still answer our own phone. Book a free 15-minute discovery call, or give us a call at (800) 419-3730.